How to Measure Angles Without a Protractor – Online Tool + 4 Practical Home Methods (2026)
You are installing a shelf that needs to sit at a specific angle. Or a student working through geometry without the right tools. Or a carpenter who left the angle finder in the other bag. Whatever the situation the physical protractor is not here, the measurement still needs to happen.
The good news is that angles can be measured or estimated surprisingly well using methods you can do right now with things already around you. This guide covers four practical home methods and one digital solution that works on any screen in seconds.
Quick Reference: Common Angles to Recognize
Before measuring, it helps to visualize. Here are the angles you encounter most often:
| Angle | Degrees | What It Looks Like |
|---|---|---|
| Flat line | 180° | Straight across – no angle at all |
| Right angle | 90° | Corner of a square or rectangle |
| Diagonal (medium) | 45° | Halfway between flat and upright |
| Steep slope | 60° | A typical roof pitch |
| Gentle slope | 30° | A ramp or gentle incline |
| Acute angle | < 90° | Sharper than a right angle |
| Obtuse angle | > 90° | Wider than a right angle, less than flat |
Method 1: Use the Free Online Protractor (Fastest)
The most accurate and easiest method especially for students – is the digital protractor. No physical tools required, no math, no setup.
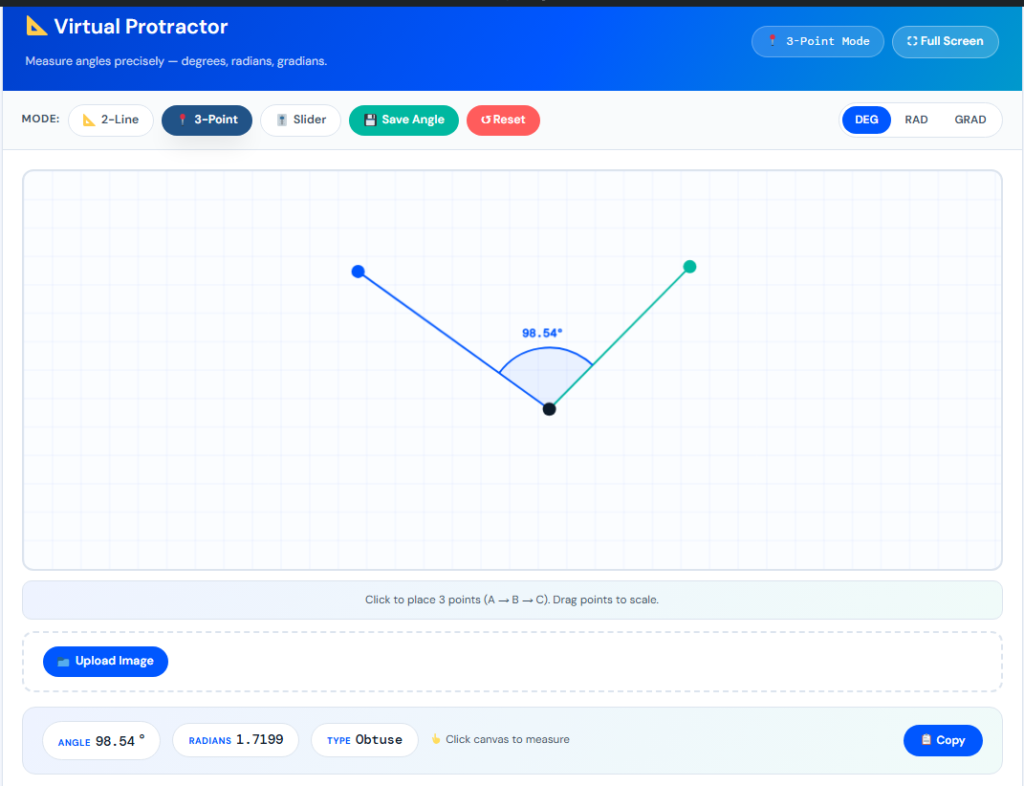
Open the Online Protractor on your phone or laptop. Place the center point over the vertex of the angle you want to measure, align one arm of the protractor with one side of the angle, and read the degrees where the other side crosses the scale.
For angles on paper: hold your phone flat over the paper and use the on-screen tool to align the measurement. For physical angles like shelf brackets or door hinges: photograph the angle from directly above and use the tool on the photo.
The online protractor shows both the angle and its supplement (180° minus the angle), which is useful for carpentry and geometry work where you need both values.
Method 2: The Paper Folding Method
Paper folding gives you precise reference angles without any instruments. You start with known angles and build from there.
- A flat sheet of paper is exactly 180 degrees – it is a straight line.
- Fold it in half – you now have a 90-degree right angle. The fold crease is perpendicular to the edge.
- Fold the 90-degree angle in half – you now have 45 degrees.
- Fold the 90-degree angle into thirds (equal thirds) – each third is 30 degrees.
- Fold the 60-degree angle (two thirds of 90) in half – you get 60 degrees. The remaining section is 30 degrees.
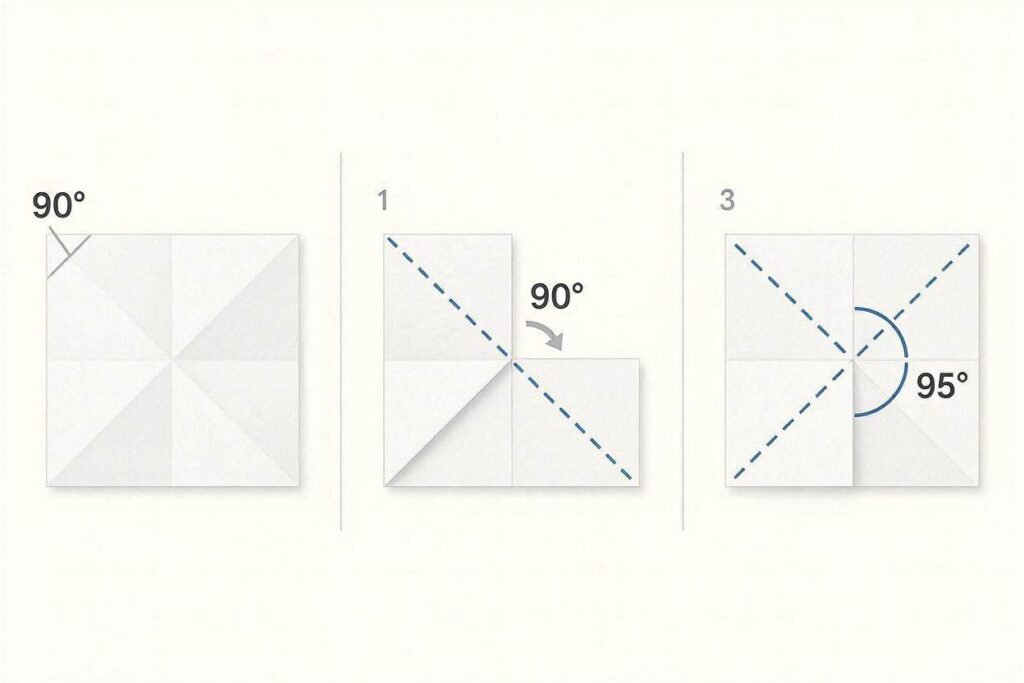
You can now compare your paper fold to an unknown angle and estimate whether it is closer to 30, 45, 60, or 90 degrees. This is surprisingly useful for geometry homework and craft projects where exact decimal precision is not required.
Method 3: The Clock Face Method
Every clock face is a circle divided into 60-minute segments. Since a full circle is 360 degrees, each minute marker represents exactly 6 degrees. Each hour marker represents 30 degrees.
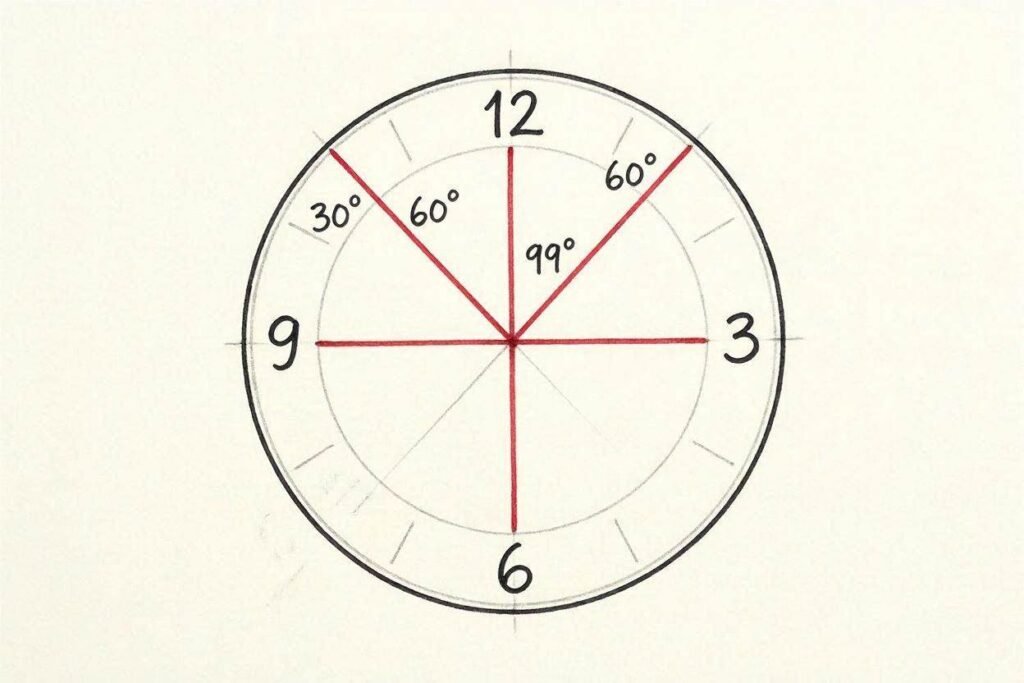
To use this method: imagine your unknown angle as clock hands. The vertex of the angle is the center of the clock. One line of the angle points to 12. Where does the other line point?
| Clock Position | Angle (degrees) |
|---|---|
| 12 to 1 (or 11) | 30° |
| 12 to 2 (or 10) | 60° |
| 12 to 3 (or 9) | 90° |
| 12 to 4 (or 8) | 120° |
| 12 to 5 (or 7) | 150° |
| 12 to 6 | 180° |
This method works best for estimating angles that fall on or near clock positions. For angles between positions, estimate proportionally – halfway between 3 and 4 on the clock face is roughly 105 degrees.
Method 4: Trigonometry with a Ruler
If you have a ruler but not a protractor, you can calculate an angle precisely using basic trigonometry. This requires drawing a right triangle where one side of your unknown angle forms the hypotenuse.
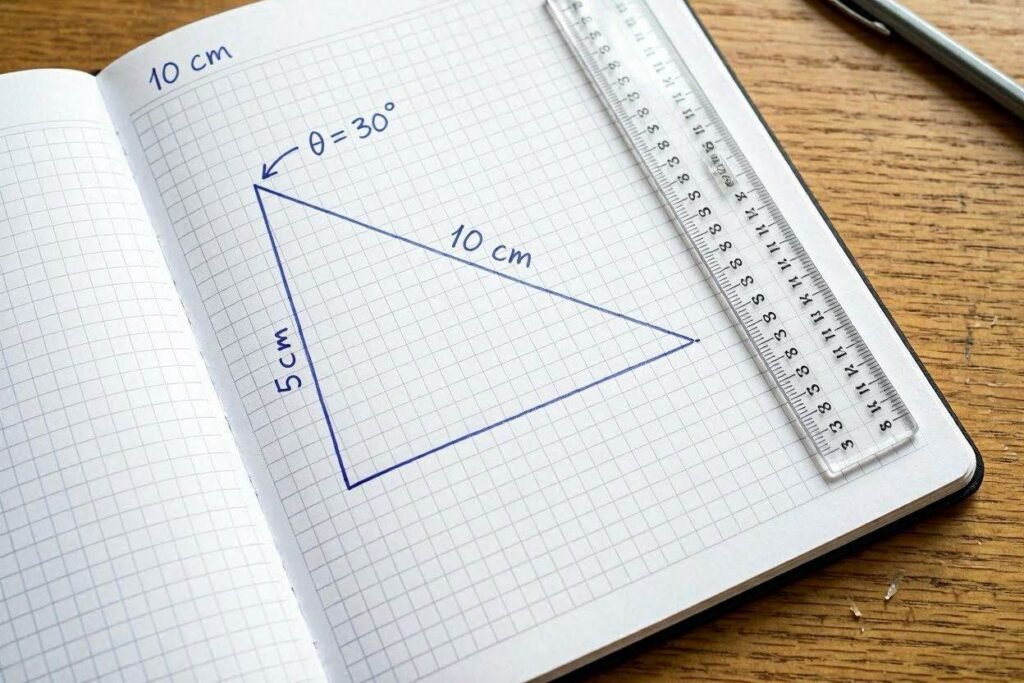
Step 1: From the vertex of the angle, measure exactly 10 cm along one of the angle’s lines. Mark this point A.
Step 2: From point A, drop a perpendicular line to the other side of the angle. Measure this perpendicular distance. Call it the ‘opposite’ side. Call the 10 cm line the ‘hypotenuse.’
Step 3: Your angle = arcsin(opposite ÷ hypotenuse). For example, if the perpendicular is 5 cm and the hypotenuse is 10 cm: arcsin(5 ÷ 10) = arcsin(0.5) = 30 degrees.
You can look up arcsin values in a table or type ‘arcsin(0.5)’ into any calculator. Most phones have this function in scientific calculator mode.
For verification, use the Online Protractor at onlineruler.online/online-protractor/ to double-check your result. And if you need to measure the sides of the triangle precisely, the main Online Ruler at onlineruler.online works directly on screen in CM or MM.
Which Method to Use: Quick Decision Guide
| Situation | Best Method |
|---|---|
| Student doing geometry homework | Online protractor – fastest, most precise |
| Estimating a shelf angle for DIY | Clock face or paper folding – quick reference |
| Carpentry where precision matters | Trigonometry method + online protractor to verify |
| Checking if a slope is safe (ramp, path) | Paper folding to compare to 30° or 45° |
| Measuring an angle on a photo or drawing | Online protractor – hold phone over paper |
Frequently Asked Questions
Yes. Take a photo of the angle from directly above (bird’s eye view perpendicular to the surface) for best results. Then open the image and the online protractor on your screen, overlay the tool, and read the angle.
90 degrees (right angles) are the most common by far – used in every corner of every wall, floor, and furniture piece. 45 degrees comes second (mitre joints, diagonal cuts). 60 degrees appears in equilateral triangular designs.
These methods are designed for flat (2D) angles. 3D angle measurement requires specialized equipment. For most practical purposes, projecting the 3D object onto a flat surface and measuring the resulting 2D angle is a good approximation.
The most common cause is the saw drifting from the marked angle during the cut, not the angle measurement itself. Always clamp your workpiece and use a guide when cutting at specific angles.